Ubuntu 1804 Preseed Installation
By Stu Feeser on February 22, 2024
If you want to learn how to automate the installation of ubuntu 18.04 using preseed you are at the right place. First, a warning on trying to PXE boot your server: don't do it until you run through the exercise below. There's a lot of trial and error involved just to get a preseed working from USB. A USB delivers initrd directly to the server, eliminating the variable of delivering the same over the network. Once you can automatically boot a machine from USB, then graduate to network booting. No effort will be wasted. Everything you do here will apply to PXE booting.
Tools and files used in this exercise:
- windows 10 laptop running rufus
- USB Key
- /boot/grub.cfg
- /preseed/acorn.seed
- ubuntu 18.04 server download ISO
- AMD64 server
Files NOT used in this blog but mentioned in other blogs:
- isolinux/txt.cfg (It did not impact my system)
Steps
-
Download rufus and install on a windows 10 machine. Rufus will be used to create your bootable USB key.
RUFUS
Do you prefer to keep-it-Linux? Use CUBIC. Here is an excellent blog on how to use cubic.
-
Download the latest 18.04 image. Make sure the download is meant to be installed on a dedicated server.
ubuntu-18.04
-
Insert your USB key into your laptop.
-
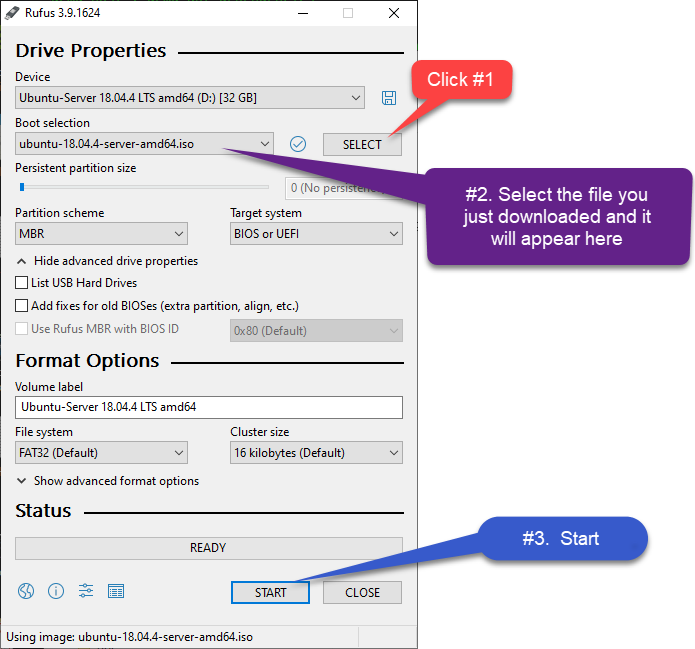
Run rufus as follows:
- Click SELECT
- Select the ubuntu ISO file you just downloaded.
- Click START
-
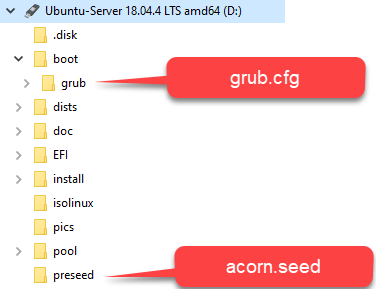
After the USB key has been created by rufus, here is the location of the files you need to edit:
-
Edit the grub.cfg file to suit your taste. I deleted all the menu items I knew I would not need. This left a very simple GRUB file, only offering options I know I will need. This grub menu file will:
-
Display a bright yellow selector line. (set menu_color_highlight=black/yellow)
-
Display two options at the boot menu:
**ALTA3 INSTALL SUMI-01 -- SUMI-10**
**THE OLD WAY-ANSWER ALL THE QUESTIONS MANUALLY**
Note that
locale=en_USandkeymap=usentry in thelinuxline. This must be set in the grub menu. It will be too late to set these values by the time the preseed file starts running. That is the only anomaly in the GRUB config file.if loadfont /boot/grub/font.pf2 ; then set gfxmode=auto insmod efi_gop insmod efi_uga insmod gfxterm terminal_output gfxterm fi set menu_color_normal=white/black set menu_color_highlight=black/yellow set timeout=30 menuentry "ALTA3 Install SUMI-01 to SUMI-10" { set gfxpayload=keep linux /install/vmlinuz file=/cdrom/preseed/acorn.seed locale=en_US keymap=us quiet --- initrd /install/initrd.gz } menuentry "The OLD WAY - ANSWER ALL THE QUESTIONS MANUALLY" { set gfxpayload=keep linux /install/vmlinuz file=/cdrom/preseed/ubuntu-server.seed locale=en_US keymap=us quiet --- initrd /install/initrd.gz }
-
-
Save your grub.cfg file to the USB
/boot/grub/grub.cfg -
In order to keep your password very secure, enter the following command at a linux command line.
openssl passwd -6then enter the password you intend to assign to your server -
Save the SHA hash as you will need it below.
-
Here is a working preseed file, only missing a password hash which you must add according to the preceding step. Read this file and all the comments very closely. The toughest part will be the partition manager recipe. Read this blog for some clarity Save the file as
acorn.seed. If you choose a different name than acorn.seed, that is fine, just make sure it matches the name you specify in /boot/grub.cfg.## SUMI-1 to SUMI-10 # ************* # Localization # ************* # LANGUAGE - US "VERSION" OF ENGLISH (LOL) d-i debian-installer/locale string en_US # KEYBOARD - FORCE US VERSION d-i console-setup/ask_detect boolean false d-i keyboard-configuration/xkb-keymap select us #**************** # NETWORK CONFIG #**************** # SELECT INTERFACE - CAREFUL MAKE THIS MATCH YOUR SYSTEM d-i netcfg/choose_interface select ens2f1 # FORTUNATELY, DHCP OVERRIDES THESE SETTINGS SO ANYTHING HERE WILL DO d-i netcfg/get_hostname string sumi-new d-i netcfg/get_domain string localdomain # NO SPECIAL HARDWARE FOR US, SO DONT CHECK d-i hw-detect/load_firmware boolean false #***************** # MIRROR SETTINGS #***************** d-i mirror/country string manual d-i mirror/http/hostname string us.archive.ubuntu.com d-i mirror/http/directory string /ubuntu d-i mirror/http/proxy string #************************************************* # ACCOUNT SETUP USING CRYPT3 HASHING OF PASSWORDS #************************************************* # CREATE UBUNTU USER ACCOUNT WITH SUDO BY DEFAULT d-i passwd/username string ubuntu d-i passwd/user-fullname string ubuntu # PASSWORD USING CRYPT3 HASH # "openssl passwd -6" at the linux command line will do this SHA-256 hash for you! d-i passwd/user-password-crypted password $HASH-GOES-HERE-HASH-GOES-HERE-HASH-GOES-HERE-HASH-GOES-HERE-HASH-GOES-HERE- # SKIP PASSWORD COMPLEXITY CHECK d-i user-setup/allow-password-weak boolean true # NO HOME DIRECTORY ENCRYPTION d-i user-setup/encrypt-home boolean false #******************** # CLOCK AND TIMEZONE #******************** # SET THE HARDWARE CLOCK TO UTC d-i clock-setup/utc boolean true # TIMEZONE d-i time/zone string US/Eastern # USE NTP TO SET CLOCK DURING INSTALL d-i clock-setup/ntp boolean true # NTP SERVER - USE GOOGLE NTP #d-i clock-setup/ntp-server string time1.google.com #******************* # PARTITIONING NVME #******************* # PERMIT OLD STUFF TO BE CLOBBERED d-i partman-lvm/confirm boolean true d-i partman-lvm/confirm_nooverwrite boolean true # READ THIS BLOG TO UNDERSTAND PARTMAN RECIPE: https://www.bishnet.net/tim/blog/2015/01/29/understanding-partman-autoexpert_recipe/ # EXPERT PARTITION INFO (500G NVRAM DISK SUMI 1-10 /dev/nvme0n1) # partition #1 = 512M GPT, MinSize=512MB, MaxSize=512MB, PrioritySize = 512MB # partition #2 = 30G SWAP # partition #3 = -1 ROOT EXT4 (/) d-i partman-auto/disk string /dev/nvme0n1 d-i partman-auto/method string regular d-i partman-lvm/device_remove_lvm boolean true d-i partman-auto/choose_recipe select gpt-root-swap d-i partman-auto/expert_recipe string \ gpt-root-swap :: \ 512 512 512 fat32 $primary{ } method{ efi } device{ nvme0n1 } format{ } . \ 28000 28000 28000 linux-swap $primary{ } method{ swap } device{ nvme0n1 } format{ } . \ 437400 437400 -1 ext4 $primary{ } $bootable{ } method{ format } device{ nvme0n1 } format{ } use_filesystem{ } filesystem{ ext4 } mountpoint{ / } . ## You now have some work to do. The preseed will stop at this point. ## DO NOT UNCOMMENT THE FOLLOWING until the above works. Then uncomment the next four lines #d-i partman-partitioning/confirm_write_new_label boolean true #d-i partman/choose_partition select finish #d-i partman/confirm boolean true #d-i partman/confirm_nooverwrite boolean true #****************************************************************** # NEED A RAID TOO? Use ansible after the system is created! # Preseed in best at confiuring one dive, enough to boot the system #****************************************************************** #************* # APT STUFF #************* tasksel tasksel/first multiselect d-i pkgsel/include string openssh-server vim net-tools htop #***************************************** # Auto upgrade off and no language-support #***************************************** d-i pkgsel/install-language-support boolean false d-i pkgsel/update-policy select none #****************************************** # Verbose output and no boot splash screen #****************************************** d-i debian-installer/quiet boolean false d-i debian-installer/splash boolean false #******************************************* #Skip the last message about being complete #******************************************* d-i finish-install/reboot_in_progress note -
Save the above file on the USB as /preseed/acorn.seed along with all the other ".seed" files in that directory.
Conclusions:
A semi-automated preseed is OK!
Automating an installation using preseeding is best done initially by writing a preseed that answers as many of the questions as possible, but not necessarily all of them. It is OK to handle the disk management completely manually for your first attempt. Do not think success means a totally hands-off install. Answer all the easy questions first, then add more lines to the preseed script as you gain experience.
Edit the GRUB menu
I smile every time I need to install a system using my USB stick loaded with my preseed files, and the grub menu that I created greets me with stark yellow text on a black background, prompting me with questions relative to my environment. Take the grub menu text seriously. Often when you need to load a system from scratch, it is 2:00 am, you are tired, and a clear menu choice is a huge help.
Don't even think of network booting
If you are reading this, you are not ready to network boot anything. Get your systems to boot from a USB first, with a fully automated preseed that you eventually will develop. Skip this step at your own peril. You have been warned.
Learn how to write SIMPLE partman recipes
Partitioning disks using a partman recipe is going to be as hard or easy as you choose to make it. I think you should set your goal to partition only a single drive to boot your machine. Once the machine is created, use your favorite configuration tool, like Ansible to actually configure a RAID, add more mount points, or what other fancy things you need to do. Do not show off by writing a complex d-i partman-auto/expert_recipe string to accomplish all your disk configuration when you should remain focused on just booting the bare metal. If you ignore this, you will spend days getting some complicated recipe that involves multiple drives, RAID, etc. to work. Invest that time by performing all additional disk management using Ansible. Writing a playbook to complete disk management will take much less time than trying to do the same thing with partman, and then you have infrastructure-as-code which can readily be changed as needs change.
Still want to network boot?
So, you can plug in a USB stick and watch the machine boot all the way to an OS prompt and that is not good enough? You want to rebuild bare metal without entering the data center? If you have made it this far, you are now ready to attempt network booting providing that you have a clean boot from a USB and playbooks that can complete the installation. PXE booting is a totally different subject and will not be covered here. You should be aware that all your work so far will carry forward in that effort.